
3D Modelling and Photogrammetry
Photogrammetry is the process of taking lots of photos of an object or place and using software to create 3D models from those images. Photogrammetry is used a lot in archaeology to help survey sites and objects. As a result, models of those objects can be made available to people all over the world.
Background
In the professional world, photogrammetry is usually undertaken with a quality DSLR camera and PC-based software like Agisoft Metashapes. However, this can certainly seem intimidating to try out as a beginner. Luckily, these days, most phones are powerful enough to use photogrammetry, and several apps now exist that let you give it a go!
In this activity we are going to try and scan an object using a phone to make a 3D model. We will be using an app called KIRI Engine. While many apps do exist this is one of the best choices as the app is free and has very minimal restrictions on what you can do with it without having to pay. It also works on both iOS and Android phones from the last few years.
You will need:
- Wifi connection to download the app and process your model.
- Smartphone
- An object to scan (Your object to scan can be anything you like, from a piece of pottery, a tool or even something like a family heirloom. Smaller objects are easier to scan, especially on a phone, so if you can, try and pick something that isn’t too large).
Method
1. Set up your object for scanning. Place the object in a well-lit place that you can easily circle 360° around. Try to avoid having any harsh shadows or lighting on the object, as this can make it harder for the software to scan it.
2. Next, download the KIRI Engine app from either the App Store or Play Store. If you are under 16 and using an adult’s smartphone make sure to ask an adult for help if you need it, and make sure that you have permission as well!
Once the app has finished downloading, open it up and swipe left through the introduction screens until you are prompted to make an account. We recommend allowing notifications, as this will make it easier to see when your model finishes processing. Making an account isn’t strictly necessary, as you can use the app just fine without one. However, you won’t be able to get your model off the app at the end if you don’t have an account.
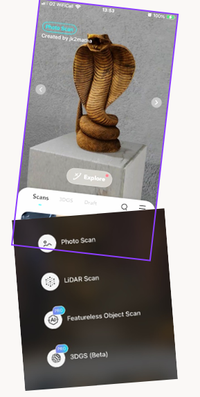
3. After making an account or skipping past that step, the app will give you some prompts that you can safely go past by pressing next. Once you are on the app's home screen, press the large plus button at the bottom to start a new scan.
4. After pressing the button, select the photo scan option, followed by the take photos option. If the app asks for access to your phone's camera, accept it. This will take you to the photo screen. You can safely close the prompts that appear describing the advanced camera settings as these aren’t necessary to create a decent model. However, feel free to play around with these later if you’d like.
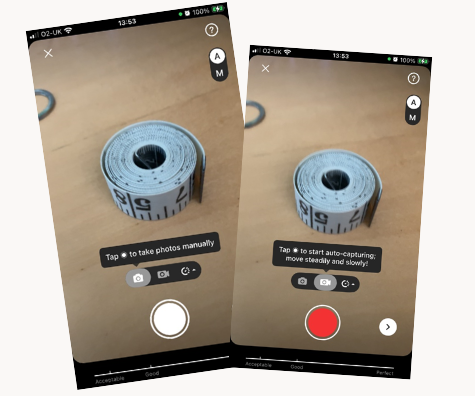
5. Now it’s time to scan your object! By default, the app will be set to take photos manually; however, if your device supports it, you can set the camera to ‘automatic photo mode’, which is the button next to ‘manual mode’. In manual mode, you must walk around your object and take photos of it in a full circle from various angles. In automatic mode, it’s the same except the app takes the photos for you at regular intervals. Which method you use is down to personal preference. Have a go experimenting with both if you can!
At the bottom of the screen, you’ll see a bar labelled ‘Acceptable’, ‘Good’, and ‘Perfect’. The higher that bar is filled, the better. Don’t worry if you don’t fill it to perfect, or even good, as you can always start again and even an acceptable level of photos can produce a good model. Be aware that on the free version of the app, you can only take up to 70 pictures.
6. Once you have finished taking your pictures, press the little arrow button to the right of the camera button. This will take you to the edit page, where you can give your model a name. There are several settings here that can be changed; however, you don’t need to worry about most of them. You can turn off ‘Train AI’ and ‘Visibility’ if you’d like, and make sure the file format is set to OBJ.
7. Finally, press upload to complete the process! It may take a little while for your model to upload depending on what the internet connection is like where you are. Make sure you don’t close the app while the pictures are uploading. Once the images have been uploaded, you’ll be taken back to the main page of the app, where you will be able to see your model listed with the status of ‘Queueing.’ This means that the app is processing your pictures into a 3D model.
Once your model is Queuing, it’s safe to close the app. If you have notifications enabled the app will let you know when it’s finished. If not, don’t forget to check back in!
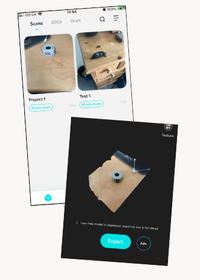
8. Queueing and processing your model can take some time. In this example, it took around 20 minutes for the model to be completed. Once your model is finished, you’ll be able to view it in the app and see how it came out. On the home screen, just tap on your model from the list. If you’re happy with it you can press the large export button at the bottom of the page. You’ll be taken to the export page but if you didn’t make an account at the beginning, you won’t be able to export it. However, your model will be saved on the app, and you can come back to it later.
When exporting, make sure to select ‘Free Export Coupons’ before you export. The app gives you three free exports every week, otherwise you will have to pay a fee to export your model.
Once you’ve exported your model, it will send a copy via email to the address you created your account with. You can then open it on a computer to view it better.